Showing posts with label Rooting. Show all posts

Monday, 2 January 2017

How To Sucessfully Root Your LG V20

The V20 is amazing phone from LG powered by Android OS, V7.0 (Nougat). Packing impressive features such as a removable battery, expandable storage, and the latest Android version straight out of the box, the V20 is a tough phone to beat, know more about LG V20.
How To Sucessfully Root Your LG V20

There is one thing that would make the phone even better—root privileges and Superuser status. It's the only way to take full advantage of the other features like the Quad 32-bit DAC, while getting rid of bloatware at the same time! We will have to wipe the LG V20 storage in order to successfully root it, so be sure to back up your phone before proceeding.
How To Sucessfully Root Your LG V20


Requirements:
  • US open market LG V20 model US996, with an unlocked bootloader
  • Windows, Mac, or Linux computer 
  • USB data cable


Step 1

Install ADB & Fastboot

Installing ADB and Fastboot is a crucial step when it comes to rooting your LG V20. We'll be using ADB to reboot into bootloader mode, then Fastboot to flash a custom TWRP image.


Step 2

Activate Developer Options & Enable USB Debugging

If you've made it this far, that means you've already unlocked your bootloader as per the "Requirements" section. Since that process wiped your data and settings, make sure to activate Developer options and re-enable USB debugging before proceeding.


Step 3

Install TWRP

Once you've enabled USB debugging, connect your LG V20 to your computer and open up command prompt/terminal/command line (use the one corresponding to your OS of choice).
Change directories to the platform-tools folder inside of your ADB installation directory, then type in the following command to get ADB going:

  • adb start-server

Then, we'll reboot into Fastboot with:

  • adb reboot fastboot

Next, download the TWRP IMG file for the US LG V20 at the following link:


After it's full downloaded, type the following into the prompt to flash TWRP on your device.

  • fastboot flash recovery twrp-3.0.2-1-us996.img

If the file is not in your platform-tools folder, be sure to type out the full file location for the TWRP IMG (example: fastboot flash recovery C:\Downloads\twrp-3.0.2.1-us996.img). Alternatively, you can click on the IMG and drag it onto the command prompt/terminal/command line window, then hit enter, and Fastboot will flash TWRP to your device.


Step 4

Launch TWRP

Launching TWRP at this stage can be a bit tricky, so be sure to read through this step fully before starting.

Open the back casing and pull out the battery, then put the battery back in and close the casing. Next, press and hold the power button and the volume down button until the LG logo appears. Release the power button for approximately one second, then press and hold it again—release both buttons when the TWRP screen appears.


Step 5

Allow System Modifications

This is when we will wipe the device storage and factory reset, so be sure to back up your data if you used your phone after unlocking the bootloader. When TWRP launches, it will ask you if you want to allow system modifications. We do, otherwise TWRP will need to be reinstalled every time we want to use it. So go ahead and swipe right on that.


Step 6

Decrypt Device Storage

Next, we'll want to decrypt the V20's storage by wiping the device.

Tap on the "Wipe" tab, then touch the "Format Data" option. Type in "yes" and tap the little check mark on your keyboard.


Step 7

Reboot TWRP

After using the "Format Data" setting, TWRP will state you might need to reboot TWRP in order to gain access to your data partition, so that's exactly what we're going to do.
We're going to reboot to TWRP from TWRP.

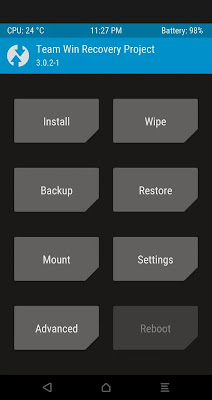
Go back to the TWRP main screen, open the "Reboot" tab, then select "Reboot Recovery."


Step 8

Flash SuperSU for System-Less Root 

Next, you'll need to flash SuperSU on your phone to permanently root the device. So when TWRP finishes rebooting, tap the "Advanced" tab, touch "ADB Sideload," then swipe the slider to start things up. After that, download the SuperSU ZIP from your computer using the following link, then go back to command prompt/terminal/command line.


Type in the following, remembering to use the exact download path to the SuperSU ZIP, or to drag and drop the ZIP like we did with the TWRP IMG earlier.

  • adb sideload SR5-SuperSU-v2.78-SR5-20161130091551.zip

Hit enter and wait for TWRP to flash the SuperSU ZIP.


Step 9

Reboot & Verify Root

Reboot your phone once TWRP finishes installing SuperSU, and you should be fully rooted when you get back up. To verify this, download an app called Root Checker by developer joeykrim.


From there, just open the app, then tap "Verify root" and press "Grant" on the Superuser access request. If everything went off without a hitch, you'll see a message saying "Congratulations! Root access is properly installed on this device!"
You have successfully root your LG V20.


Source: Android.wonderhowto
Read More »

Sunday, 11 December 2016

How To Successfully Root Tecno Phantom Phones

Here are tutorials on how to root tecno Phantom Phones ranging from Phantom Pad II (G9), A,  A+, A2, B3, N9, S7, D3, S9, and Phantom Z (A7).

Root Tecno Phantom Devices Phones
Due to the improvement in Android OS, most of the newly released Android phones does enable the native way of rooting through mobile apps, so here I have make sure I organise working tutorials on how to root tecno phantom phones, if your phone is among the listed phone above consider yourself lucky.

Also some of the tutorials explained below works perfectly on some tecno phones most especially if your tecno phone operating system is below 5.0 lollipop.

Follow this guide carefully Damtops will not be held responsible for any brick that may further emerge

How To Root Tecno Phantom Z A7


Phantom Z (A7) operating system is 4.4.2 KitKat this make it support rooting through apk.
Root Tecno Phantom Z A7

Note: You can also use this guide to root all tecno phones below Android version 5.0 lollipop.

  1. Download latest version of Kingroot 
  2. Install the app on the phone 
  3. Ensure you have an internet connection on the phone then launch the app 
  4. Wait for all checks to be complete 
  5. Click the center button (with Root and some Chinese texts inscribed on it) to begin rooting
  6. Wait for rooting to complete 
  7. You should see a green tick to confirm that rooting was successful.

How To Root Phantom Pad II G9

Root Tecno Phantom 2 G9

  1. Download iRoot Official
  2. Install it on the phone
  3. Ensure you have an active internet connection then launch it
  4. Click the Root button
  5. Give it a few seconds and your phone should now be rooted


How to root Tecno Phantom A, A+ , A2, B3, N9, S7, S9 and D3 


Requirement:
  1. PC
  2. Working USB Cable
Get those two items ready and follow the below step carefully.
  • Download Eroot 
  • Download PdaNet below
  • Enable USB debugging on the phone, to do that go to (Phone Settings > Scroll down and click Developer > Tick USB Debugging)
Activate USB debugging rooting tecno phantom phones
  • Connect the phone to the PC then install PdaNet, you should get a "Drivers successfully installed" message at the end of installation 
  • Extract the Eroot.exe and Launch it
  • A root button will appear. If it doesn't, close the PdaNet running from your system tray.
  • Click on the root button and your phone will be rooted in 10 seconds.
You can download Root checker to confirm if your phone is successfully rooted. 
Read More »

Sunday, 11 September 2016

How to Successfully Root Infinix Hot 4 - X557

This post is sourced from HOVATEK, you can get the original post Here, also credit goes to Jemmini for supplying the infinix hot 4 Recovery. Do you want root your infinix hot 4? If yes, you're lucky to see this post. I believe most android users understand what ROOTING means, for those who don't understand, Rooting means unlocking the operating system so you can install unapproved apps, delete unwanted bloatware, update the OS, replace the firmware, overclock (or underclock) the processor, customize anything and so on. In addition rooting enables user to have full control to design or re-designed your device as you wish.
There are two major ways of rooting an android phone either through PC softwares or Andriod apps. But with the release of Android version 6 (Marshmallow) rooting is not as easy as latter versions in order to achieve successful rooting without soft brick some techniques has to be applied.

Infinix Hot 4 X557 runs on Android 6 (Marshmallow) OS it's also powered by the MT6580 System on Chip (SoC), making it not fully supported by rooting apks at the moment. This tutorial will teach you how to root your Infinix Hot 4 X557.

how to root infinix hot 4


How to Root Infinix Hot 4

  • Firstly Install VCOM drivers on your PC using Here
  • Download SuperSU 2.76.zip Here
  • Copy the SuperSU.zip to both the phone’s SD card and internal storage
  • Download TWRP for Infinix Hot 4 Here
  • Switch off the phone (still with battery inside)
  • Flash the TWRP recovery.img to the phone using SP Flash tool Here
  • Boot the phone into recovery mode using Volume up button + Power button (Press the two button simultaneously)
  • In TWRP, if you get a prompt asking you to swipe to allow modification of the System partition, tap KEEP READ ONLY
  • If TWRP offers to root the phone, select NO
  • In TWRP recovery, tap Install
  • Navigate to the location of the SuperSU 2.76.zip and select it
  • Swipe to confirm flashing of SuperSU.zip and wait till flashing is complete
  • Reboot the phone normally.


UPDATE: A lot of people find it hard to root their Infinix hot 4 device, so I decided to attach this short video tutorial below to guide you through the rooting process and files used in this video are all available on this page. 


First of all understand the process and apply it carefully, surely you'll get a successful root access. 

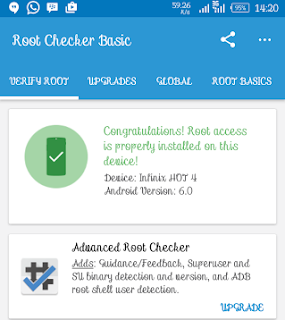
Root Checker Confirmation of Infinix hot 4
Confirm Root by installing and running Root Checker

Read More »

Tuesday, 6 September 2016

How to Successfully Root Wiko U Feel and Wiko U lite

This post is sourced from HOVATEK, you can get the original post Here. The Wiko U Feel and Wiko U Feel Lite are Mediatek MT6735 chipset (SoC) powered Android phones which ship with Android 6.0 (Marshmallow), which makes it quite impossible for rooting apks at the moment. Here are the spec of Wiko U Feel and Wiko U Lite. This guide will teach you how to easily root either of these Wiko devices.
how to root wiko u feel and wiko u lite

How to Root Wiko U Feel or Wiko U Feel Lite Android phone


Also See: How To Root Tecno Phantom Phones

Requirements:
1. A PC
2. A working USB cable
Follow the below guide carefully
  • Download TWRP for Wiko U Feel (Marshmallow) ported by Team Hovatek here 
  • Download TWRP for Wiko U Feel Lite (Marshmallow) ported by Team Hovatek here 
  • Setup ADB and Fastboot on the PC using the guide here 
  • Extract and copy the TWRP recovery.img into the same folder as the fastboot.exe and adb.exe 
  • Unlock the Bootloader of the Wiko U Feel or Wiko U Feel Lite using the guide here 
  • Download SuperSU 2.76.zip here 
  • Copy SuperSU.zip to both the phone’s SD card and internal storage 
  • Connect the phone to the PC via USB cord while switched On and boot it into Fastboot (as instructed in the Bootloader unlock guide) 
  • When the phone enters Fastboot, flash the TWRP recovery image to the phone by typing the command below then pressing Enter 
 fastboot flash recovery recovery.img
  • Once recovery is flashed in fastboot, hold the Volume up + Power button and don’t release till the phone reboots. When it does, select Recovery from the list 
  • In TWRP, if you get a prompt asking you to swipe to allow modification of the System partition, tap KEEP READ ONLY 
  • If TWRP offers to root the phone, select NO In TWRP recovery, tap Install 
  • Navigate to the location of the SuperSU2.76.zip and select it 
  • Swipe to confirm flashing of SuperSU.zip and wait till flashing is complete 
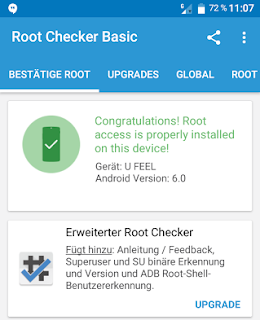
root checker successful rooting for wiko u feel and wiko u lite

Reboot the phone normally Confirm Root by installing and running Root Checker

Read More »

Wednesday, 24 August 2016

How to Successfully Root Tecno W4

This post is sourced from HOVATEK, you can get the original post Here. How to Root Tecno W4 the direct successor to Tecno W3, Tecno W4 is the first Tecno phone to run on V6.0 Marshmallow makes it relatively impossible for present rooting apps, If you recall I made a post on how to Root Tecno W3, check here How to Root Tecno W3. This guide is to show you how to root Tecno W4 successfully without soft brick. You can also check complete Tecno W4 Spec here
how to root tecno w4

How to Root Tecno W4

Requirements to root tecno w4:
  • A PC
  • A working USB cable
  • And your tecno w4 at hand
Follow the below guide:
  • Install VCOM drivers on your PC using Here
  • Download SuperSU 2.66.zip Here
  • Copy SuperSU.zip to both the phone’s SD card and internal storage
  • Download TWRP for Tecno W4 ported by Team Hovatek Here
  • Switch off the phone (still with battery inside)
  • Flash the TWRP recovery.img to the phone using SP Flash tool  Here
  • Boot the phone into recovery mode using Volume up button + Power button
  • In TWRP, if you get a prompt asking you to swipe to allow TWRP modify the system partition then go ahead and swipe. To swipe, place your finger on the green circle then slide it to the right
  • In TWRP recovery, tap Install
  • Navigate to the location of the SuperSU.zip and select it
  • Swipe to confirm flashing of SuperSU.zip and wait till flashing is complete
  • Reboot the phone normally
    Confirm Root by installing and running Root Checker
    Read More »

    Sunday, 31 July 2016

    How To Successfully Root Tecno Camon C9

    This post is sourced from HOVATEK, you can get the original post Here. Recently I emphasized what Rooting Of Android Phone is all about, The Tecno Camon C9 is one of the latest Smartphone from Tecno's collection and the direct successor to Camon C8. The Camon C9 at the moment does not support any available one-click rooting apks because this device runs on version 6.0 (Marshmallow). Today I will show you the complete guide to Root Tecno Camon C9 Successfully.

    Follow This Guide To Root Tecno Camon C9

    There are two main steps:
    1. Unlocking the Bootloader of the Tecno Camon C9
    2. Flashing the CWM recovery.img and SuperSU.zip

    Download SuperSU 2.66.zip at http://hovatek.com/redirect.php?link=https://docs.google.com/uc?id=0B9srKhKuVIMnZHlTVjhrVEJjdWM&export=download

    Copy SuperSU.zip to both the phone’s SD card and internal storage

    Download CWM for Tecno Camon C9 ported by Team Hovatek at http://hovatek.com/redirect.php?link=https://docs.google.com/uc?id=0B_-waNKLvNRcbDNoVHpCcGo0aXc&export=download

    Extract and copy the CWM recovery.img into the same folder as the fastboot.exe and adb.exe

    Unlock the Bootloader of the Tecno Camon C9 using the guide at https://forum.hovatek.com/thread-14288.html

    Connect the phone to the PC via USB cord while switched On and boot it into Fastboot (as instructed in the Bootloader unlock guide)

    When the phone enters Fastboot, flash the recovery.img to the phone by typing the command below then pressing Enter fastboot flash recovery recovery.img

    Reboot the phone by typing the command below then pressing Enter fastboot reboot

    Boot the phone into recovery mode by switching off and using Volume up button + Power button (see https://forum.hovatek.com/thread-479.html)

    In Clockworkmod recovery mode, you use the Volume up button to scroll up, Volume down button to scroll down and Power button to select

    Scroll down to Install zip and select it

    Select Choose zip from /storage/sdcard1

    Navigate to the location of SuperSu.zip and select it

    Select Yes – Install SuperSU to confirm flashing

    Wait till flashing is complete Return to the home screen (using the back option) then select Reboot

    If CWM offers to help fix a missing Root, select No

    Confirm Root by installing and running Root Checker

    Credit goes to mukubya @ TeamHovatek for supplying the needed stock recovery .bin and confirming.
    Read More »

    Tuesday, 19 July 2016

    How To Successfully Root Tecno W3

    This post is sourced from HOVATEK, you can get the original post Here. I believe most android users understand what ROOTING means, for those who don't understand, Rooting means unlocking the operating system so you can install unapproved apps, delete unwanted bloatware, update the OS, replace the firmware, overclock (or underclock) the processor, customize anything and so on. In addition rooting enables user to have full control to design or re-designed your device as you wish.
    how to root tecno w3
    There are two major ways of rooting an android phone either through PC softwares or Andriod apps. But with the release of Android version 6 (Marshmallow) rooting is not as easy as latter versions in order to achieve successful rooting without soft brick some techniques has to be applied.
      Tecno W3 was released with Android 6 (Marshmallow) OS, making it not fully supported by rooting apks at the moment. This brief guide will explain how to flash TWRP and root the Tecno W3. You can also view Tecno W3 Spec Here  

    Also See: 
    How to Root Tecno W4
    How To Root Tecno Phantom Phones

    How To Root Tecno W3
    • Install VCOM drivers on your PC using Here
    • Download SuperSU 2.66.zip Here
    • Copy SuperSU.zip to both the phone’s SD card and internal storage
    • Download TWRP for Tecno W3 ported by Team Hovatek Here
    • Switch off the phone (still with battery inside)
    • Flash the TWRP recovery.img to the phone using SP Flash tool  Here
    • Boot the phone into recovery mode using Volume up button + Power button
    • In TWRP, if you get a prompt asking you to swipe to allow TWRP modify the system partition then go ahead and swipe. To swipe, place your finger on the green circle then slide it to the right
    • In TWRP recovery, tap Install
    • Navigate to the location of the SuperSU.zip and select it
    • Swipe to confirm flashing of SuperSU.zip and wait till flashing is complete
    • Reboot the phone normally
    root checker tecno w3 rooted

    Read More »